Introduction
There are many hosting providers which hosts website assets like images and videos at very reasonable cost but they all have some limit on their free plan whereas in aws s3 bucket we get 100 gb of free bandwidth forever and very cheap pay as you go prices . Today I will show you how to hosts your website assets on aws s3 bucket .
Host on aws s3 bucket with default url
On your aws account dashboard ( create one if you don't have ) go to the s3 bucket and create a " general purpose " bucket with your desired name ( preferably your website domain like example.com ) , while creating the bucket uncheck "Block all public access" and then create the bucket with default settings .
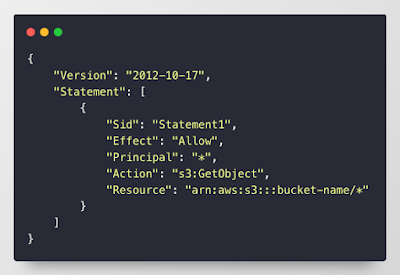
Now go to your bucket name > Permissions > Bucket Policy , click on edit and paste this :-
note : replace the bucket name with your bucket name , like example.com in this case .
It will allow you to access your object / Files on bucket with public url . That's it , now you can upload your files and access them from url provided by aws , which looks like this : https://s3.region.amazonaws.com/bucket-name/file-name . You can view this url by visiting the file you uploaded in bucket .How to add custom url to your bucket
You might want to display your website assets with your custom url like media.example.com/file-name . We can do so in aws s3 like this :-
In this we will follow the same steps we had done above , there are only 2 changes to make :
2. DNS Records :- go to your domain name dns settings and add a CNAME Record with name as your bucket name like media.example.com and inside value add this url bucket-name.s3.region.amazonaws.com . Replace the bucket-name and region with your actual s3 bucket detail . That's it , wait for sometime for the dns to take effect , it generally happens in around 10 to 15 minutes but it can take upto 48 hrs depending on your dns provider .
Conclusion
Hope you like this method for any problem related to it or any suggestion you can ask me in comment section . if you like this then do share it with others also . Thank You !


Comments
Post a Comment